Quickly create docker container for Dynamics 365 Business Central

If you work with Dynamics 365 Business Central as a developer then you more than likely know about the excellent BContainerHelper used to download artifacts and create containers.

Wanting a quick way to utilize this, I created my own module than leveraged this – well today it got an overdue update.

Mine can be found here, installing it is a mere command away

Install-Module -Name bc365-create-container

Using it, simple, in its simplest form, the following will get you going

New-BC365Container -ContainerName *name* -Auth NavUserPassword

Simply specify your container name, then follow through the prompts to select type (OnPrem/Sandbox), language version etc and it will do the work for you.

In the recent update however, I’ve added commands to get the preview and the insider builds (if you’re a Partner like us, and have access to them).

For the preview, just add -Preview $true, so

New-BC365Container -ContainerName *name* -Auth NavUserPassword -Preview $true

For insider builds, it would be

New-BC365Container -ContainerName *name* -Auth NavUserPassword -Insider $true

Simple as that. As a final note, when my containers have been created I always like to run the following to make sure the containers don’t auto start with windows each time

docker update *name* --restart=no

Using OpenSSL on Windows to create a pfx certificate from a private key and cert file

Creating an PFX from a private key file and crt file on Windows.

Every year the task comes around to renew the SSL certificates for various services, depending on the certificate provider you can’t always download it as a PFX file.

Now for some services that’s fine, but for others – in this case Azure, we need to upload a PFX file.

Now, in this example it was a cert generated by GoDaddy. We get the private key in a file, along with the .crt file. What we need to do is use the 2 and generate the pfx.

We can use the OpenSSL executable, but where to find this on Windows, well if you have Git Desktop installed you can usually find it in the following folder.

C:\Program Files\Git\usr\bin

Now one note with the private key file, it is usually saved in the wrong encoding, so open it up in notepad (yes it will work for this), or your editor of choosing, you need to make sure the encoding type is UTF-8, my originally key file for example was saved as UTF-8 with BOM – it just doesn’t work.

I usually add this folder to my environment PATH, but that’s your choice.

If you have added it to your PATH, then enter the following at the command prompt in the folder you have your cert file (.crt) and private key file (.key)

openssl pkcs12 -export -in yourcert.crt -inkey yourprivatekey.key -out yournewpfx.pfx

If you didn’t add it to the PATH, then you will need to run the above command from the OpenSSL.exe folder.

Either way, replace the bold files with the appropriate ones for you, it should ask you for a password, then create your PFX file for you.

Easy 🙂

Powershell module for creating Microsoft Dynamics 365 Business Central docker containers using artifacts – New version

Getting the public preview Business Central Docker artifacts for you local containers

I’ve just released a new version of my powershell module that I use to create my local docker instance of Business Central.

Nothing too fancy, but there is now an extra parameter you can pass to make it look at the Public Preview releases..

The new parameter is -Preview. So to use it you would type something like:

New-BC365Container -ContainerName yourname -Auth NavUserPassword -SSL $true -Preview $true

That’s it, the new version is 0.0.7, (apt timing with the version number;)).

Be sure to get it by using the Install-Module command:

Install-Module bc365-create-container

ASPNET Core – asp-append-version for remote images

Solving the asp-append-version problem with remote files in aspnet core with a custom TagHelper

I recently came across an issue where the site wasn’t refreshing images that the customer has updated even though they had changed them. Obviously browser caching was the original thought – which it was.

Some background, the is hosted on Azure and provided a back end portal for customers (B2B) to be able to order products via the website, these in turn are then pushed to the customers Microsoft Dynamics NAV instance (also known now as Microsoft Dynamics 365 Business Central). This has been developed my my Consultancy company in the UK – TAIG Solutions

In this instance the product images are actually stored seperately to the Azure site – they are hosted on the customers own on-prem server this makes it easier for the designers to update the images, they can just overwrite the image with a new one…. and here lies the problem…

One of the tools we have available is the asp-append-version tag which, when applied to the img tag basically adds a hash value of the file onto the end of the url, so for example

<img src="yourdomain.com/image.png?v=1234567890" />

The ?v=1234567890 being key, normally each time the file is served a hash is generated based on the file, so if the image changes, so does the hash and the browser will force a refresh of the image and not use the cached image.

However, this doesn’t work with files that are stored remotely, as we found out. There are a couple of solutions to this problem, but the easier we chose was to use the same versioning, but generate our own hash value – but not based on the file, we’d use the date (in this case they change the images so often we decided to do it on a day-by-day basis, but you could do something not as regular).

So how do we do this, we create our own TagHelper of course.

In your project, create a new class with the following code:

using Microsoft.AspNetCore.Razor.TagHelpers;
using System;

namespace TAIG.Solutions.WebPortal.TagHelpers
{
    [HtmlTargetElement("static-image-file", TagStructure = TagStructure.WithoutEndTag)]
    public class StaticImageTagHelper : TagHelper
    {
        // Can be passed via <static-image-file image-src="..." />. 
        // PascalCase gets translated into kebab-case.
        public string ImageSrc { get; set; }

        public override void Process(TagHelperContext context, TagHelperOutput output)
        {
            output.TagName = "img";    // Replaces <static-image-file> with <a> tag

            // create a version
            string version = DateTime.Now.ToString("yyyyMMdd"); // caching for a day - could use a setting in future?

            // generate url
            string url = $"{ImageSrc}?v={version}";

            output.Attributes.SetAttribute("src", url);
        }
    }
}

Now, in your _ViewImports.cshtml file we need to add the following

@addTagHelper TAIG.Solutions.WebPortal.TagHelpers.StaticImageTagHelper, TAIG.Solutions.WebPortal

Obviously if you changes the class name you need to adjust it, and make sure you change the namespace to the one you are using.

The result now, is we can now use our own tag instead of image, so instead of

<img src="yourdomain.com/image.png?v=1234567890" />

We can now use

<static-image-file image-src="yourdomain.com/image.png" />

Now code code will add a ?v= along with a date value which changes each day.

Problem solved. Yes, if they change an image during the day then, if you have viewed the page already you would have to wait until the following day for it to change, but that is good enough for us.

The Service Principal Name (Delegation) configuration has been set incorrectly – Microsoft Dynamics NAV 2017

The Service Principal Name (Delegation) configuration has been set incorrectly using Microsoft Dynamics NAV 2017

I’ve recently been working on a Microsoft Dynamics NAV 2017 installation, to which I was setting up the web client which hadn’t been used before. Now I’ve done many of these setups and they all worked fine, but this one..

Well I got the following error:

Error accessing Website Microsoft Dynamics NAV 2017 Web Client
Raw Url: /live/WebClient/SignIn.aspx?ReturnUrl=%2flive%2fWebClient%2f
Url: https://localhost/live/WebClient/SignIn.aspx?ReturnUrl=%2flive%2fWebClient%2f
Type: Microsoft.Dynamics.Nav.Types.NavSecurityNegotiationException
Message: The Service Principal Name (Delegation) configuration has been set incorrectly. Server connect URL: “net.tcp://localhost:7046/live/Service”. SPN Identity: “DynamicsNAV/localhost:7046”

There was plenty more in the event log, but not of use here. At first I thought it was an SPN issue, but turns out to just need a small change on IIS.

To fix this, open IIS, then expand the server. Now go into Application Pools.
Open Advanced Settings on the Microsoft Dynamics NAV 2017 Web Client entry, then scroll down and find Load User Profile.

Change this to False.

Restart IIS, now it should work.

Enjoy.

Starting the Job Queue on a Business Central Docker container

How to enable the Task Scheduler on a Business Central Docker container to use the Job Queue

By default the Task Scheduler for Business Central is not enabled, so if you add anything to the Job queue in your docker image it just sits there, doing nothing!

To enable it we need to use the following command

Invoke-ScriptInNavContainer

For instance, if you container name is called BCDemo, then you would run the following command

Invoke-ScriptInNavContainer -containername BCDemo -scriptblock {
    Set-NavServerConfiguration -ServerInstance BC -KeyName EnableTaskScheduler -KeyValue true
    Set-NavServerInstance -ServerInstance BC -restart
}

Essentially, change the BCDemo in the above command to match your container name. This script will then change the setting and restart your instance for you.

Task Scheduler will now be running, and the Job queue will actually do something for you now.

Enjoy.

Enabling TCP and Named Pipe connections (Accessing via IP address)

How to access SQL server direct using an IP address

An out of the box SQL installation will be default not allow you to connect to it via an IP address, an issue I recently came across while trying to connect to my local development SQL instance via a local docker container.

To enable access via an IP address, do the following.

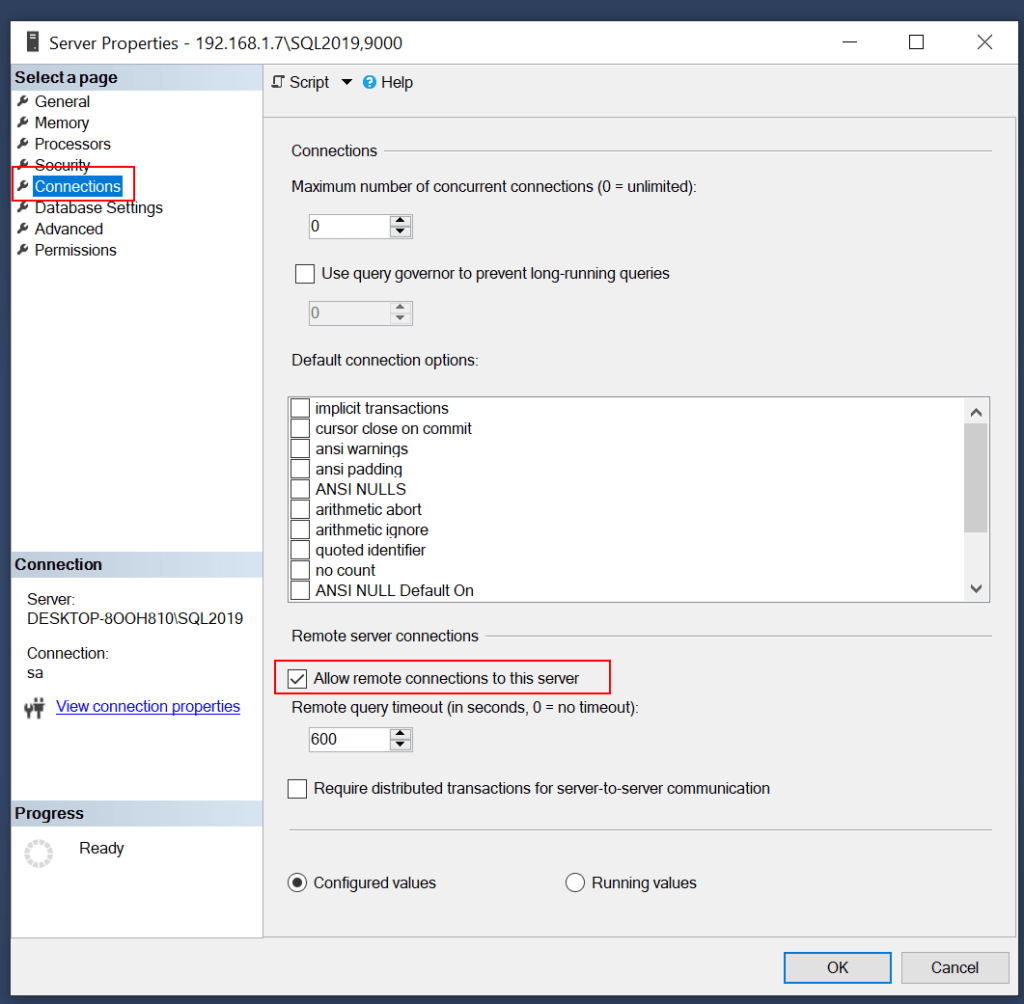
Open SQL Management studio, right click on the server and select properties, then select the connections page.

Now, make sure the Allow remote connections to this server is enabled.

Next, from the run command (Windows key + R), type in mmc, and click Run.

Now, select File -> Add/Remove snap-in, and select SQL Server Configuration Manager.

Expand the Configuration Manager and go to the SQL Server network Configuration\Protocols for SQL2019. Enable both Named Pipes and TCP/IP.

Finally right click on the TCP/IP option and select properties. Then select the IP Addresses tab. Scroll down to the IPAll section and set the port you want, for mine I am using port 9000.

Restart SQL.

Now, you should be able to connect using the IP Address and port.
Using the format [IPAddress]\[Instance],[Port]

In my case, my server would be 192.168.1.7\SQL2019,9000
This is because my computers IP is currently 192.168.1.7, my SQL instance name is SQL2019 and the port I set was 9000. If you have left the instance name as the default you could of just used 192.168.1.7,9000 and it would work.

Enjoy.

Stopping a Docker container from auto starting

I’ve started to use docker, and thus containers, a lot more recently.

One thing I have noticed is once a container has been created, when I start my computer up it auto starts the containers. Now, while good for some, I simply don’t want all my dev Docker containers auto starting. So how do we stop this… well… read on.

If the RestartPolicy of the container is set to always then it will restart, you can check this by typing

docker inspect my-container

Look for the RestartPolicy section in the output

To change the policy, type:

docker update --restart=no my-container

Where my-container is your container name.

Thats it, when you restart your computer your container will no longer auto start.

Powershell module for creating Microsoft Dynamics 365 Business Central docker containers using artifacts

Using a powershell module to easily download a BC365 artifact and create a container

Microsoft Dynamics 365 Business Central, formally known as Dynamics NAV, has provided us partners with a new one way of developing the product.

Previously we would use the developer tool ‘Object designer’ to delve into the product and change the way it works or add complete new functionality for our customers. Now, we are presented with the latest method, Extensions.

Now it’s fair to say they have been around for a while now, initially the v1 extensions… yes moving on quickly to what we have now.

I’m a big fan I must say, initial hesitation aside and no doubt future challenges we’ll face, but seeing an out of the box solution being lit up with new features without touching the base code, might impressive.

Anyway, to facilitate this development the old method of creating a dev environment is dead in the water. In comes Docker, and more recently artifacts.

I am not going to delve too much into it to be honest, there are plenty of resources available, primarily you need the bccontainerhelper, but putting it all together is a little time consuming, and the last thing we want is our team members to have to spend unnecessary time spinning up a new container.

So the answer, my new PowerShell module (and my first!), it can be found on the gallery here

Before you get going you need the BcContainerHelper from the powershell gallery (which also has everything you need too – for more see here). Anwyay to install this type

Install-Module -Name BcContainerHelper

To install, from a PowerShell prompt type:

Install-module bc365-create-container

Once imported, you can simply run it by typing:

New-bc365container

This is its simplest form, and will prompt you for a container name., it will default to Windows authentication, no ssl and CSide installation.

The current parameters available are:

ContainerName: specifies the container name
Auth: Authentication type, either Windows or NavUserPassword (defaults to windows if not specified
SSL: Obvious I think! Defaults to false.
CSide: Install the CSide client etc. Defaults to false.

So for example, to run as NavUserPassword, with SSL and with CSide type:

New-BC365Container -ContainerName yourname -Auth NavUserPassword -SSL $true -CSide $true

I will be added new parameters over the next few weeks as well as other improvements, but not will get you there quicker I think.

The source is also available on GitHub

All future parameter updates etc will be posted on GitHub.

c# excel interop – cannot access the file

In a recent project we had the need to create a pivot table in Excel from an existing spreadsheet.

Should be relatively easy… as always never as straight forward as it should be!

I’m not going to show the whole code for creating the pivot, but in essence to create a pivot table you need to

  • Open the spreadsheet
  • Select the data range
  • Create a pivot cache
  • Create the actual pivot table
  • Add the Row/Column/Data fields
  • Save the file.

Easy right, well yes so far. This is the basics of the code:

            Application excelApp = new Application();
            Workbook excelWorkBook = excelApp.Workbooks.Open(file);
            Worksheet excelworksheet = excelWorkBook.ActiveSheet;
            Worksheet sheet2 = excelWorkBook.Sheets.Add();

            try
            {

                sheet2.Name = sheetname;
                excelApp.ActiveWindow.DisplayGridlines = showGridLines;


                Range oRange = excelworksheet.UsedRange;
                PivotCache oPivotCache = excelWorkBook.PivotCaches().Add(Excel.XlPivotTableSourceType.xlDatabase, oRange);  
                PivotCaches pch = excelWorkBook.PivotCaches();

                pch.Add(Excel.XlPivotTableSourceType.xlDatabase, oRange).CreatePivotTable(sheet2.Cells[1, 1], "PivotTable", Type.Missing, Type.Missing);// Create Pivot table

                PivotTable pvt = sheet2.PivotTables("PivotTable");
                pvt.ShowDrillIndicators = true;
                pvt.InGridDropZones = false;


                // add rows

                // add columns

                // add data fields

                #region Misc

                sheet2.UsedRange.Columns.AutoFit();

                pvt.ColumnGrand = true;
                pvt.RowGrand = true;

                excelApp.DisplayAlerts = false;

                if (removeSourceSheet)
                    excelworksheet.Delete();

                sheet2.Activate();
                sheet2.get_Range("B1", "B1").Select();

                #endregion

                excelWorkBook.SaveAs(file, Type.Missing, Type.Missing, Type.Missing, Type.Missing, Type.Missing, Excel.XlSaveAsAccessMode.xlNoChange, Type.Missing, Type.Missing, Type.Missing, Type.Missing, Type.Missing);
                excelApp.DisplayAlerts = false;
                excelWorkBook.Close(0);
                excelApp.Quit();

                return "OK";

            }
            catch (Exception ex)
            {
                excelWorkBook.Close(0);
                excelApp.Quit();

                return ex.ToString();

            }

So that’s it really, running it works a treat… unfortunately this is where my problems start.

When running in unattended mode you get something like:

A call to ‘x’ failed with this message: Microsoft Excel cannot access the file ‘<filename>’. There are several possible reasons:

The file name or path does not exist.
The file is being use by another program.
The workbook you are trying to save has the same name as a currently open workbook

Now personally I think this is misleading.. as it turns out to be none of those reasons!

Turns out excel interop doesn’t like running in unattended mode, aka non interactive or whatever you would like to call it – but I need it too.

Step in some black voodoo magic 🙂

Turns out you need to make sure 2 folders exist for it to work, and there are:

  C:\Windows\System32\config\systemprofile\Desktop
  C:\Windows\SysWOW64\config\systemprofile\Desktop

Now, when it runs it works perfectly. It should be noted this isn’t support by Microsoft, so use at your own risk – and it could stop working at any point in time!